
- Choosing The Right Hosting Plan
- Comparing Shared, Vps, And Cloud Hosting
- Creating A Hostinger Account
- Selecting A Domain Name
- Configuring Hosting Features
- Applying Promo Codes And Discounts
- Completing The Payment Process
- Setting Up Your Hosting Dashboard
- Installing WordPress Or Other Cms
- Managing Support And Resources
- Frequently Asked Questions
- Conclusion
Looking to buy hosting from Hostinger, but not sure where to start? You’re in the right place.
Choosing the right hosting can feel confusing, especially with so many options out there. But it doesn’t have to be hard. In this guide, you’ll learn exactly how to pick the best Hostinger plan for your needs, step by step.
By the end, you’ll feel confident and ready to get your website online fast. Keep reading to discover simple tips that save you time and money!
Choosing The Right Hosting Plan
Choosing the right hosting plan is key to your website’s success. It affects speed, storage, and how many visitors your site can handle. Picking a plan that fits your needs saves money and avoids future problems.
Hostinger offers several hosting plans. Each plan suits different types of websites and budgets. Understanding these options helps you pick the best one for your project.
Shared Hosting
Shared hosting means your website shares a server with others. It is the cheapest option. Good for small websites or blogs with low traffic. Easy to use and manage. Limited resources, but enough for basic sites.
Cloud Hosting
Cloud hosting uses multiple servers to host your site. It offers better speed and reliability. Good for growing websites with moderate traffic. More expensive than shared hosting. Scales resources automatically as your site grows.
Vps Hosting
VPS means Virtual Private Server. It gives you more control and resources. Suitable for medium to large websites. You get your own space on a server. More technical knowledge needed than shared hosting.
WordPress Hosting
WordPress hosting is optimized for WordPress sites. Faster and more secure for WordPress users. Includes features like automatic updates and backups. Ideal for bloggers and small business websites using WordPress.
Consider Your Website Needs
Think about your website type and traffic. Small blogs do well on shared hosting. Business sites may need VPS or cloud hosting. Plan for future growth to avoid switching plans later.
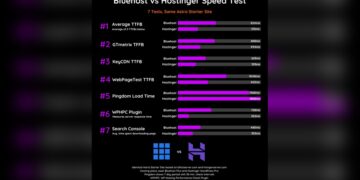
Comparing Shared, Vps, And Cloud Hosting
Choosing the right hosting type is important for your website’s success. Hostinger offers three main options: Shared, VPS, and Cloud hosting. Each type has different features and benefits. Understanding these can help you pick the best one for your needs.
Shared hosting is the most basic and affordable. VPS hosting gives more control and power. Cloud hosting offers flexibility and high performance. Let’s explore each type in detail.
Shared Hosting
Shared hosting means your website shares a server with others. This lowers costs because resources are split. It is easy to use and good for small sites or beginners. Performance may slow if many sites use the server at once. It includes basic features and limited control.
Vps Hosting
VPS stands for Virtual Private Server. It gives you a private space on a shared server. You get more power and control than shared hosting. VPS works well for medium sites needing better speed and security. You can install custom software and manage settings. It costs more but offers better performance.
Cloud Hosting
Cloud hosting stores your site on multiple servers. It provides high reliability and fast loading times. If one server fails, another takes over instantly. This option scales easily with traffic changes. Cloud hosting is good for growing businesses and busy websites. It offers flexible pricing based on usage.
Creating A Hostinger Account
Creating a Hostinger account is the first step to buying web hosting. It is simple and fast. You only need a few minutes to sign up. A Hostinger account lets you manage your hosting plans, domains, and billing all in one place.
Setting up an account is easy even for beginners. You do not need special skills or technical knowledge. Just follow clear steps, and you are ready to go.
Visit Hostinger’s Website
Open your web browser and go to Hostinger.com. The homepage will show hosting options and prices. Look for the “Sign Up” or “Register” button. It is usually in the top right corner. Click it to start creating your account.
Enter Your Email And Password
Fill in your email address carefully. Use an email you check often. Create a strong password with letters and numbers. Avoid simple or common passwords. This keeps your account safe.
Choose Your Account Type
Hostinger offers personal and business accounts. Select the one that fits your needs. Most users pick personal accounts. Businesses get extra tools and support with business accounts.
Verify Your Email Address
After signing up, Hostinger sends a confirmation email. Open your email inbox and find the message. Click the verification link inside. This activates your account and lets you log in.
Log Into Your New Account
Return to Hostinger’s website. Click the login button. Enter your email and password. You will see your account dashboard. From here, you can buy hosting and manage settings.

Credit: www.youtube.com
Selecting A Domain Name
Selecting a domain name is a key step when buying hosting from Hostinger. It shapes your website’s identity online. A good domain name is short, clear, and easy to remember. It helps visitors find your site quickly. This section guides you through the process of choosing the right domain name for your new website.
Choosing A Simple And Clear Domain Name
Pick a domain name that is easy to spell and say. Avoid complex words or long phrases. Short names stick in people’s minds better. Clear names help users type your address without errors. Think about how your visitors will search for your site.
Including Keywords In Your Domain
Use words that relate to your website’s topic. Keywords help search engines understand your site. This can improve your site’s ranking in search results. Keep the keywords natural and not forced. Avoid stuffing too many keywords into the domain name.
Selecting The Right Domain Extension
The domain extension is the suffix like .com, .net, or .org. Choose one that fits your website’s purpose. .com is the most popular and trusted extension. Local businesses can use country-specific extensions like .us or .uk. Select an extension that matches your audience and brand.
Configuring Hosting Features
Configuring hosting features is a key step after buying hosting from Hostinger. It lets you set up your website exactly how you want. This part is simple and clear. You can adjust many options to fit your needs. These settings help your site run fast and stay secure.
Hostinger offers easy controls for your hosting plan. You can manage storage, email, and security features quickly. Each feature plays an important role in your website’s success. Setting them right saves time and avoids problems later.
Choosing The Right Storage And Bandwidth
Storage is where your website files stay. More storage means room for images, videos, and content. Bandwidth controls how much data visitors can use. Pick enough bandwidth to handle your visitors well. Hostinger shows clear options for both. Adjust these based on your website size and traffic.
Setting Up Email Accounts
Hostinger lets you create custom email addresses. Use your domain name for a professional look. Set up emails easily in the control panel. You can add multiple accounts for different purposes. This keeps your communication organized and trusted.
Enabling Security Features
Security is important for your website and visitors. Hostinger includes SSL certificates to protect data. Turn on SSL with a few clicks. Also, use backups and firewall options. These tools keep your site safe from attacks and loss.
Installing A Content Management System
Most users install WordPress or other CMS platforms. Hostinger’s auto-installer makes this fast. Choose your CMS and follow simple steps. This helps you build and update your website easily. No coding skills needed.
Applying Promo Codes And Discounts
Applying promo codes and discounts can save money on Hostinger hosting plans. The process is simple and quick. Just follow a few easy steps to enjoy lower prices.
Always check for valid promo codes before buying. Promo codes often offer the best deals available.
Where To Find Hostinger Promo Codes
Look for promo codes on Hostinger’s official website or trusted coupon sites. Signing up for newsletters can also provide exclusive discounts. Social media pages sometimes share special offers too.
How To Enter Promo Codes During Checkout
Add your chosen hosting plan to the cart. On the checkout page, find the promo code box. Type or paste the code exactly as shown. Click “Apply” to update the total price.
What To Do If A Promo Code Does Not Work
Check the code’s expiration date. Make sure it matches the hosting plan you selected. Try removing spaces or typing the code again carefully. Use a different code if needed.
Completing The Payment Process
Completing the payment process is the last step to start your hosting journey with Hostinger. It confirms your plan and activates your account. The process is simple and fast, designed for a smooth experience.
Before paying, review your order carefully. Check the hosting plan, billing cycle, and any extra services. Make sure everything is correct to avoid issues later.
Choose Your Payment Method
Hostinger offers several payment options. You can pay using credit or debit cards. PayPal is also available for quick payments. Some regions support local payment methods too.
Select the option that suits you best. Each method is secure and easy to use. No need to worry about your payment details.
Enter Payment Details
Fill in your payment information accurately. For cards, enter the number, expiry date, and CVV code. Double-check all details to prevent errors. Incorrect info can delay your hosting activation.
Confirm Your Purchase
Review your order summary once more. Click the confirm or pay button to complete payment. Wait a few seconds for the system to process your transaction.
You will receive a confirmation email. It contains important account and billing information. Save this email for your records and future reference.

Credit: www.youtube.com
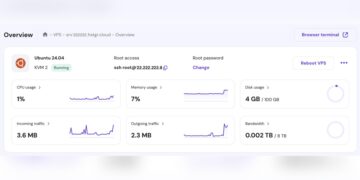
Setting Up Your Hosting Dashboard
Setting up your hosting dashboard is the first step after buying hosting from Hostinger. This dashboard is your main control panel. It helps you manage your website, domains, emails, and more. Getting familiar with it saves time and effort.
The Hostinger dashboard is user-friendly. Even beginners find it easy to use. You can find all important tools in one place. This section guides you through the setup process step-by-step.
Accessing Your Hostinger Dashboard
After purchasing a hosting plan, log in to your Hostinger account. The dashboard link appears on your account homepage. Click on it to open the control panel. This is where you control your hosting services and settings.
Understanding The Dashboard Layout
The dashboard has a simple layout. The main menu is on the left side. It includes options like Websites, Domains, Emails, and Billing. The center area shows quick stats and shortcuts. This helps you find key features fast.
Configuring Your First Website
To set up your website, click on the “Websites” section. Choose “Add Website” to start. Enter your domain name and select the hosting plan. Hostinger offers easy installation for popular platforms like WordPress. Follow the prompts to complete setup.
Managing Emails And Domains
Hostinger lets you create and manage emails from the dashboard. Navigate to the “Emails” tab to add new accounts. For domains, use the “Domains” section to connect or buy new ones. Managing all in one place makes tasks faster.
Using Support And Resources
The dashboard includes a help center and live chat support. Use these resources if you face issues. Tutorials and guides are available for common questions. Accessing support is simple and quick from the dashboard.
Installing WordPress Or Other Cms
Installing WordPress or another CMS on Hostinger is easy and fast. It helps you start building your website right away. Hostinger offers tools that simplify the process. You do not need technical skills to get your site online.
Choosing the right CMS depends on your website needs. WordPress is the most popular choice for blogs and business sites. Other CMS options include Joomla and Drupal. Hostinger supports many CMS platforms for your convenience.
Accessing Hostinger’s Control Panel
Log in to your Hostinger account. Go to the control panel, called hPanel. It is simple and user-friendly. The control panel is where you manage your hosting and install apps.
Selecting The Auto Installer
Find the Auto Installer tool in hPanel. Click to open it. This tool helps install WordPress or other CMS quickly. You do not need to upload files or use FTP.
Choosing Your Cms
Pick WordPress or another CMS from the list. The installer shows many options. Select the one that fits your site type. The process is the same for all CMS.
Filling In Site Details
Enter your website name and admin username. Create a strong password for security. Add your email address to recover your login. These details set up your CMS admin account.
Starting The Installation
Click the install button to begin. The system installs files automatically. This takes a few minutes. After installation, you get a confirmation message.
Accessing Your New Website
Use your domain and add /wp-admin for WordPress login. Enter your admin username and password. Now, you can customize your site. Add themes, plugins, and content easily.
Credit: www.hostinger.com
Managing Support And Resources
Managing support and resources is key after buying hosting from Hostinger. Good support helps solve problems fast. Resources guide you in using your hosting well. Both keep your website running smoothly.
Hostinger offers many tools and help options. These make managing your hosting easier. They save time and reduce stress. Knowing where to find support and resources is important.
Contacting Hostinger Support
Hostinger provides 24/7 live chat support. You can ask questions anytime. The support team answers quickly and clearly. They help with technical issues or account questions. Support is available in many languages.
Using The Help Center
The Help Center has many articles and guides. It covers setup, domains, emails, and more. Each guide uses simple steps and pictures. You can search for topics or browse by category. It is a great place to learn on your own.
Accessing The Control Panel
The control panel is where you manage your hosting. It has tools for files, databases, and emails. You can also check website stats here. The panel is easy to use and well organized. It helps you control your website without extra help.
Utilizing Tutorials And Videos
Hostinger offers tutorials and videos for beginners. They explain hosting basics and advanced topics. Videos show step-by-step instructions to follow. Tutorials help you understand complex tasks. These resources improve your hosting skills over time.
Frequently Asked Questions
What Is Hostinger Hosting And Why Choose It?
Hostinger offers affordable, reliable web hosting with easy setup and good speed for websites.
How Do I Select The Right Hostinger Hosting Plan?
Choose a plan based on your website size, traffic, and the features you need.
Can I Buy Hosting And Domain Together On Hostinger?
Yes, you can buy both hosting and a domain in one simple checkout.
What Payment Methods Does Hostinger Accept?
Hostinger accepts credit cards, PayPal, and several local payment options.
How Do I Create An Account On Hostinger?
Sign up with your email, choose a plan, and complete payment to create an account.
How Long Does Hostinger Take To Activate Hosting?
Hosting activates within minutes after payment is confirmed.
Can I Upgrade My Hostinger Hosting Plan Later?
Yes, Hostinger allows easy plan upgrades anytime from your control panel.
Does Hostinger Provide A Money-back Guarantee?
Hostinger offers a 30-day money-back guarantee on most hosting plans.
How To Access Hostinger’s Control Panel After Purchase?
Log in to your Hostinger account and open the hPanel to manage hosting.
Is Hostinger Suitable For Beginners To Buy Hosting?
Yes, Hostinger has a simple interface and helpful guides for beginners.
Conclusion
Choosing Hostinger for your hosting needs is simple and quick. Follow the steps carefully to avoid mistakes. Pick the plan that fits your website best. Enter your details clearly and check everything twice. Payment is easy and secure with many options.
After buying, start setting up your website right away. Hostinger offers good support if you face any issues. Your website can go live in no time. Ready to build your online presence? Now you know how to buy hosting from Hostinger with ease.